Beat adjustment is a normal process required for regulating any mechanical movement and is typically required after initial set-up or after movement servicing, such as cleaning and oiling. The beat adjustment may also be required after moving the clock from one location to another.
The beat of the movement is regulated by the pendulum, and adjusting the beat ensures that the pendulum will continue to swing in order to keep the movement operational. A rhythmic and even “tick-tock” will be a key resulting characteristic of proper beat adjustment.
The information supplied here applies to current pendulum mechanical movements purchased through Klockit.
Newer-Model Mechanical Clock Movements:
To begin, make certain the movement/case is level front to back and side to side. Most newer-model mechanical clock movements may be equipped with a self-adjusting escapement for auto-beat adjustment. If such is the case, mechanical beat adjustment is as simple as over-swinging the pendulum. The initial start-up pendulum over-swing would be approximately 3” to 4” to the left /right (from the center) plus the bob diameter of the pendulum.
Example:
A 10” diameter bob will require pulling the pendulum bob 13” to 14” to one side from the center. Let the pendulum go and allow it to swing. As it swings, it should self-adjust to the proper beat.
Older-Model Mechanical Clock Movements:
In the event that you have an older movement or a movement that is not equipped with a self-adjusting escapement, you can perform a manual mechanical beat adjustment.
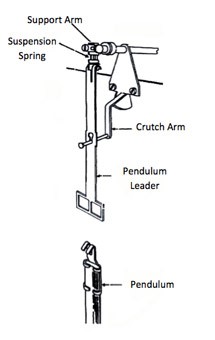
Start by removing the pendulum from the pendulum leader. The crutch arm inserts through the pendulum leader about midway above where the pendulum hangs. Take hold of the pendulum leader and crutch arm (where the two meet) and gently move the crutch arm to one side, stopping once you feel slight resistance.
Next, move the crutch arm/leader back to the center. Swing the crutch arm/leader to the opposite side until you meet slight resistance. The swing from center to left should be equal to the swing from center to right. If the movement is out of beat, the swing distance from the center to the left side will be unequal to the swing distance from the center to the right side.
To manually adjust the beat, you will need to push through the slight resistance on the “shorter” swing side so that free travel of the crutch arm is even on each side of the center. Please note that several adjustments may be necessary until the crutch arm can be pushed an equal distance from center to left as it can from center to right.
Once you have an even swing to each side of the center, gently re-hang the pendulum onto the pendulum leader. Push the bottom of the pendulum no more than 1” to the left or right to start the pendulum. Listen carefully to the “tick-tock”. A rhythmic and evenly spaced “tick-tock” will indicate the mechanical movement is in proper beat. If the movement has an unevenly spaced “tick-tock”, the pendulum may stop swinging after a period of time - up to a few days after starting the movement.
Repeat the process for manual mechanical beat adjustment until the movement is in the proper beat.